|
|
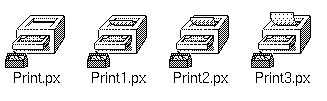
To animate your icon, present a series of icon pictures in sequence. The Print icon on the Desktop is an animated icon; when a file icon is dropped on it, paper slides out of the printer. The Print icon is animated by stepping through this series of pictures:
You can define an animated icon just like any other icon, except that you must supply more than one pixmap, along with directions for when to display each pixmap.
To create an animated icon:
The example used to illustrate these instructions defines an appointment book icon that opens when a calendar program is started. This icon picture is made of four pixmaps: closed book (picture.px), book one-third open (Calendar1.px), book two-thirds open (Calendar2.px), and open book (Calendar3.px).
For example:
4 animate $static_arg true $static_arg/Calendar1.px \ 5 $static_arg/Calendar2.px $static_arg/Calendar3.px6 /usr/bin/X11/calendar -monthly $*
For more about object scripts, see ``Define icon triggers''.
Animation can also be used to convey information about the state of your application. For example, an icon for a mail program could change its appearance to indicate that new mail has arrived. If you want to indicate the state change when an icon trigger is activated, test for the state and declare the variation class in the appropriate object script. To indicate the state change without waiting for a trigger, your application must test for the state change and send instructions directly to the Desktop (see the xdt3(XC) manual page and the Graphical Environment Guide).
The pixmaps and scripts will be installed in the icon object directory. By default, your rule file will be copied into the /usr/lib/X11/IXI/XDesktop/rules/modules directory.